Tuesday, December 27, 2011

Set Validation error for edittext in android

Set Validation error for edittext in android

Prob:

suppose user not fill the edittext filed  at the time we can show alert\error msg .

Solution:

we can solve this issue using setError().

ex code:
  @Override
    public void onCreate(Bundle savedInstanceState) {
        super.onCreate(savedInstanceState);
        setContentView(R.layout.main);
        Button btn =(Button)findViewById(R.id.button1);
        btn.setOnClickListener(new OnClickListener() {
           
            @Override
            public void onClick(View v) {
                 EditText edittext =(EditText)findViewById(R.id.editText1);
                if(edittext.getText().length()==0){
                    edittext.setError("please enter the value");
                }

            }
        });
    }

screen shot:


Wednesday, December 21, 2011

Android TextToSpeech

Android TextToSpeech:

this example for text convert speech. ex: what you are passing value into texttospeech it convert speech.
android text to speech example code ;

Emulator this is working fine but mobile you have install external library speech synthesis..... form android android market.

Goto->mobile->settings->voice input and output->text-to-speech settings->install voice data.


public class TextToSpeachActivity extends Activity implements OnInitListener {
    /** Called when the activity is first created. */
    private TextToSpeech    textToSpeech;;
    EditText edt;
    @Override
    public void onCreate(Bundle savedInstanceState) {
        super.onCreate(savedInstanceState);
        setContentView(R.layout.main);
         edt=(EditText)findViewById(R.id.edittext);
        Button btn =(Button)findViewById(R.id.button1);
        textToSpeech=new TextToSpeech(this, this);
      //  textToSpeech.setLanguage(Locale.US);
        btn.setOnClickListener(new OnClickListener() {
            @Override
            public void onClick(View v) {
                textToSpeech.speak(edt.getText().toString(), TextToSpeech.SUCCESS, null);
            }
        });
    }
    @Override
    public void onDestroy() {
        if (textToSpeech != null) {
            textToSpeech.stop();
            textToSpeech.shutdown();
        }
        super.onDestroy();
    }
    public void onInit(int status) {
    }
}

Monday, December 19, 2011

Android Tab Navigation Bar

Android Tab Navigation Bar  Example;

android tab host navigation bar  example  look like iphone navigation bar.

it's very usefull for page navigation very easyly and you can inside tabview GroupActivity.
adding tab to tab host;

  Drawable d = getResources().getDrawable(R.drawable.setting_onclick);
        ImageView img1 = new ImageView(this);
        img1.setLayoutParams(new LayoutParams(LayoutParams.WRAP_CONTENT,    LayoutParams.FILL_PARENT));
        img1.setPadding(20, 10, 20, 10);
        img1.setImageDrawable(d);
        homeTabSpec.setIndicator(img1).setContent(mainActivity);
       
        d = getResources().getDrawable(R.drawable.setting_onclick);
        img1 = new ImageView(this);
        img1.setLayoutParams(new LayoutParams(LayoutParams.WRAP_CONTENT, LayoutParams.WRAP_CONTENT));
        img1.setImageDrawable(d);
        img1.setPadding(20, 10, 20, 10);
        signinTabSpec.setIndicator(img1).setContent(mainActivity1);

       tabHost.addTab(homeTabSpec);
        tabHost.addTab(signinTabSpec);

style for onpress tab.
<?xml version="1.0" encoding="UTF-8"?>
<selector xmlns:android="http://schemas.android.com/apk/res/android">
   <item android:state_selected="false" android:drawable="@drawable/settingstrans"/>
   <item android:state_selected="true" android:drawable="@drawable/settings_onclick"  />
</selector>


dowload source code here

Android Date Picker Example

Android Date Picker Example

android sample and simple example for date picker.

creating date picker dialog.

  @Override
     protected Dialog onCreateDialog(int id) {
         switch (id) {
         case DATE_DIALOG_ID:
             return new DatePickerDialog(this,
                         mDateSetListener,
                         mYear, mMonth, mDay);
         }
         return null;
     }

date set in date picker
private DatePickerDialog.OnDateSetListener mDateSetListener =
     new DatePickerDialog.OnDateSetListener() {

         public void onDateSet(DatePicker view, int year,
                               int monthOfYear, int dayOfMonth) {
             mYear = year;
             mMonth = monthOfYear;
             mDay = dayOfMonth;
             updateDisplay();
         }
     };

updated date in text view;

private void updateDisplay() {
        tx.setText(
            new StringBuilder()
                    // Month is 0 based so add 1
                    .append(mYear).append("-")
                    .append(mMonth + 1).append("-")
                    .append(mDay).append(" "));
    }

calling date picker dialog in button onclick method

datePick.setOnClickListener(new OnClickListener() {
       
        @Override
        public void onClick(View v) {
            showDialog(DATE_DIALOG_ID);
           
        }
    });

sample screen


full activity code;

public class DatePickerExampleActivity extends Activity {
    /** Called when the activity is first created. */
    TextView tx;
   
    private int mYear;
    private int mMonth;
    private int mDay;
    static final int DATE_DIALOG_ID = 0;
    @Override
    public void onCreate(Bundle savedInstanceState) {
        super.onCreate(savedInstanceState);
        setContentView(R.layout.main);
       
      tx=(TextView)findViewById(R.id.date);
      Button datePick=(Button)findViewById(R.id.button1);
      final Calendar c = Calendar.getInstance();
      mYear = c.get(Calendar.YEAR);
      mMonth = c.get(Calendar.MONTH);
      mDay = c.get(Calendar.DAY_OF_MONTH);
      updateDisplay();
     
      datePick.setOnClickListener(new OnClickListener() {
       
        @Override
        public void onClick(View v) {
            showDialog(DATE_DIALOG_ID);
           
        }
    });
    }
   
      private void updateDisplay() {
        tx.setText(
            new StringBuilder()
                    // Month is 0 based so add 1
                    .append(mYear).append("-")
                    .append(mMonth + 1).append("-")
                    .append(mDay).append(" "));
    }

 private DatePickerDialog.OnDateSetListener mDateSetListener =
     new DatePickerDialog.OnDateSetListener() {

         public void onDateSet(DatePicker view, int year,
                               int monthOfYear, int dayOfMonth) {
             mYear = year;
             mMonth = monthOfYear;
             mDay = dayOfMonth;
             updateDisplay();
         }
     };
    
     @Override
     protected Dialog onCreateDialog(int id) {
         switch (id) {
         case DATE_DIALOG_ID:
             return new DatePickerDialog(this,
                         mDateSetListener,
                         mYear, mMonth, mDay);
         }
         return null;
     }
}
you can download sample source code here

Saturday, December 17, 2011

Android Version History

Android Version History
1.0 A-stro
1.1 B-ender
1.5 C-upcake
1.6 D-onut
2.1 E-clair
2.2 F-royo
2.3.x G-ingerbread
3.x.x H-oneycomb
4.0 I-ce Cream Sandwich

next May be Jelly bean......


Friday, December 16, 2011

Android NavigationBar Example

Android NavigationBar  Example
simple   android navigationbar look like iphone navigationbar.

layout code.
layout/actnavbar.xml.
<?xml version="1.0" encoding="utf-8"?>

<RelativeLayout
    xmlns:android="http://schemas.android.com/apk/res/android"
    android:layout_width="fill_parent"
    android:layout_height="fill_parent"
    android:background="@android:color/white"
>
    <RadioGroup
        android:id="@+id/radiogroup"
        android:layout_width="fill_parent"
        android:layout_height="60dp"
        android:layout_alignParentBottom="true"
        android:orientation="horizontal"
        android:background="@drawable/navbar_background"
    >
        <RadioButton
            android:id="@+id/btnAll"
            style="@style/navbar_button"
            android:drawableTop="@drawable/navbar_allselector"
            android:text="All"
        />
        <RadioButton
            android:id="@+id/btnPicture"
            style="@style/navbar_button"
            android:drawableTop="@drawable/navbar_pictureselector"
            android:text="Pictures"
            android:layout_marginLeft="5dp"
        />
        <RadioButton
            android:id="@+id/btnVideo"
            style="@style/navbar_button"
            android:drawableTop="@drawable/navbar_videoselector"
            android:text="Videos"
            android:layout_marginLeft="5dp"
        />
         <RadioButton
            android:id="@+id/btnFile"
            style="@style/navbar_button"
            android:drawableTop="@drawable/navbar_fileselector"
            android:text="Files"
            android:layout_marginLeft="5dp"
        />
        <RadioButton
            android:id="@+id/btnMore"
            style="@style/navbar_button"
            android:drawableTop="@drawable/navbar_moreselector"
            android:text="More"
            android:layout_marginLeft="5dp"
        />
    </RadioGroup>
   
   
    <LinearLayout
        android:id="@+id/floatingmenu"
        android:layout_width="fill_parent"
        android:layout_height="wrap_content"
        android:layout_alignParentBottom="true"
        android:layout_marginLeft="30dp"
        android:layout_marginRight="30dp"
        android:background="@drawable/laysemitransparentwithborders"
        android:orientation="vertical"
        android:layout_marginBottom="-4dp"
        android:visibility="gone"
    >
        <TextView
            android:layout_width="fill_parent"
            android:layout_height="wrap_content"
            android:paddingLeft="5dp"
            android:paddingTop="15dp"
            android:paddingBottom="15dp"
            android:text="Contacts"
            android:textColor="#ffffff"
            android:textSize="16dp"
        />
        <View
            android:layout_width="fill_parent"
            android:layout_height="1dp"
            android:background="#ff999999"
        />
        <TextView
            android:layout_width="fill_parent"
            android:layout_height="wrap_content"
            android:paddingLeft="5dp"
            android:paddingTop="15dp"
            android:paddingBottom="15dp"
            android:text="Calendar"
            android:textColor="#ffffff"
            android:textSize="16dp"
        />
    </LinearLayout>
</RelativeLayout>

values/style.xml

<?xml version="1.0" encoding="utf-8"?>
<resources>
  <style name="navbar_button">
 <item name="android:layout_width">0dp</item>
 <item name="android:layout_height">wrap_content</item>
 <item name="android:button">@null</item>
 <item name="android:background">@drawable/navbar_backgroundselector</item>
 <item name="android:gravity">center_horizontal</item>
 <item name="android:layout_weight">1</item>
 <item name="android:textSize">12dp</item>
  </style>
</resources>

Activity code


public class NavbarActivity  extends Activity {

    @Override
    public void onCreate(Bundle savedInstanceState) {
        super.onCreate(savedInstanceState);
        setContentView(R.layout.actnavbar);

        RadioButton radioButton;
        radioButton = (RadioButton) findViewById(R.id.btnAll);
        radioButton.setOnCheckedChangeListener(btnNavBarOnCheckedChangeListener);
        radioButton = (RadioButton) findViewById(R.id.btnPicture);
        radioButton.setOnCheckedChangeListener(btnNavBarOnCheckedChangeListener);
        radioButton = (RadioButton) findViewById(R.id.btnVideo);
        radioButton.setOnCheckedChangeListener(btnNavBarOnCheckedChangeListener);
        radioButton = (RadioButton) findViewById(R.id.btnFile);
        radioButton.setOnCheckedChangeListener(btnNavBarOnCheckedChangeListener);
        radioButton = (RadioButton) findViewById(R.id.btnMore);
        radioButton.setOnCheckedChangeListener(btnNavBarOnCheckedChangeListener);
    }

    private CompoundButton.OnCheckedChangeListener btnNavBarOnCheckedChangeListener = new CompoundButton.OnCheckedChangeListener() {
        public void onCheckedChanged(CompoundButton buttonView, boolean isChecked) {
            if (isChecked) {
                Toast.makeText(NavbarActivity.this,"Clicked Button ! "+ buttonView.getText(), Toast.LENGTH_SHORT).show();
            }
        }
    };
}

Sample Screen Shot:

naviigation bar for android look like iphone navigation bar. download source code here.

Tuesday, December 13, 2011

Animation between one activity to another activity in android

Animation between one activity to another activity in android.
Animation between Activity A to Activity B.
anim/mainfadein.xml
<?xml version="1.0" encoding="utf-8"?>
<alpha xmlns:android="http://schemas.android.com/apk/res/android"
            android:interpolator="@android:anim/accelerate_interpolator"
            android:fromAlpha="0.0"
            android:toAlpha="1.0"
            android:duration="1000" />
anim/splashfadeout.xml
<?xml version="1.0" encoding="utf-8"?>
    <alpha xmlns:android="http://schemas.android.com/apk/res/android"
            android:interpolator="@android:anim/decelerate_interpolator"
            android:zAdjustment="top"
            android:fromAlpha="1.0"
            android:toAlpha="0.0"
            android:duration="1000" />
just u have to this code in onCreate();
overridePendingTransition(R.anim.mainfadein, R.anim.splashfadeout);                                
                             or
calling another activity.
Intent in=new Intent(this,ActivityB.class);
startActivity();
overridePendingTransition(R.anim.mainfadein, R.anim.splashfadeout);


Thursday, November 24, 2011

Android Quick Action Bar

Android  Quick Action Bar

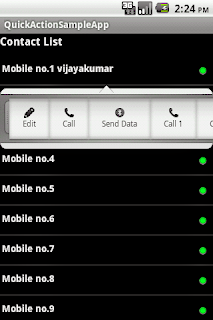
Quick Actions are basically actions/functions in a popup bar that are triggered by specific visual elements/buttons/items on the screen. Quick Actions are used to display contextual actions typically used in list views but not limited to it. You can imagine a phone-book or contact list on the phone. Now, there are certain set of actions that will be common to all contacts in the views like; make a call, send message, edit contact or may be even transfer files by  Email, Bluetooth etc. Basically these functions that are common to items in a context can be put in the Quick Action bar. This way the screen is uncluttered and simple and more importantly we needn’t sacrifice on the actions needed.


DOWNLOAD SOURCE CODE

Screen Shot :


Create Actionable Items:
The below code snippet is used to create an actionable item i.e. the actions you would want to place in the quick action bar. Creating an actionable item involves specifying the title, setting an icon that represents the item which will help you relate to the action, and finally set a Listener for the action. The term itself is self-explanatory. Yes, it is used to determine the action to be performed when clicked or pressed. As far as the icon /image goes, it can be easily set by referring to it from the resources as is the case with any external resource set in android which you would aware of, I am most certain.

final QuickActionIcons edit = new QuickActionIcons();;
 edit.setTitle("Edit");
 edit.setIcon(getResources().getDrawable(R.drawable.edit));
 edit.setOnClickListener(new OnClickListener()
 {
 public void onClick(View v)
 {
// add u r action
 }

 });]

Create Quick Action Dialog:

This part is even simpler. Like in this example, when an item in the list view is clicked / pressed, a new quick action bar/dialog is created. Then all the actionable items that you have created in the previous step are appended one by one to the quick action bar. After this you simply have to specify the animation style i.e. how do you want the dialog to be displayed on screen.

resultPane.setOnItemClickListener(new OnItemClickListener()
    {
    public void onItemClick(AdapterView<?> parent, View view, int position, long id)
    {
      QuickActionBar qab = new QuickActionBar(view);

      qab.addItem(edit);
      qab.addItem(call);
      qab.addItem(send_data);
      qab.setAnimationStyle(QuickActionBar.GROW_FROM_LEFT);

      qab.show();
    }
    });


Tuesday, November 22, 2011

Adobe Flex alert dialog example in android

Adobe Flex alert dialog example in android


ex code :

 <fx:Declarations>
        <fx:Component className="AlertMsg">
            <s:SkinnablePopUpContainer  x="200" y="300">
                <s:TitleWindow   title="Vijaykumar" click="close()" >
                    <s:VGroup horizontalAlign="center"
                              paddingTop="12"
                              paddingBottom="12"
                              paddingLeft="12"
                              paddingRight="12"
                              gap="8"
                              width="100%">
                        <s:Label
                                 paddingBottom="20" 
                                 fontWeight="bold"
                                 color="#000000"
                                 text="Please enter username and password!"/>
                        <s:Button width="50%" height="100%" label="OK" click="close()"/>
                    </s:VGroup>
                </s:TitleWindow>
            </s:SkinnablePopUpContainer>
        </fx:Component>
 </fx:Declarations>


Tuesday, November 15, 2011

Android Turn screen on, When receving notification.

 Android Turn screen on, When receving  notification.

WindowManager.LayoutParams winParams =  getWindow().getAttributes();
    winParams.flags |= (WindowManager.LayoutParams.FLAG_SHOW_WHEN_LOCKED| WindowManager.LayoutParams.FLAG_TURN_SCREEN_ON);
    getWindow().setAttributes(winParams);

Sorting an Array and ArrayList in Android

 Sorting an ArrayList  in Android 
in this method for sorting names or contact list in alphabetical order

ArrayList<User> res = new ArrayList<User>();
res.add(…);
res.add(…);
Comparator<User> comperator = new Comparator<User>() {
@Override
public int compare(User object1, User object2) {
return object1.name.compareToIgnoreCase(object2.name);
}
};
Collections.sort(res, comperator);


Sorting an Array in Android


User[] res = new User[];
res.add(…);
res.add(…);
Comparator<User> comperator = new Comparator<User>() {
@Override
public int compare(User object1, User object2) {
return object1.name.compareToIgnoreCase(object2.name);
}
};
Array.sort(res, comperator);

Monday, November 14, 2011

How to check screen off mode in android ?

 How to check screen off mode in android ?

PowerManager pm = (PowerManager) getSystemService(Context.POWER_SERVICE);
         boolean isScreenOn = pm.isScreenOn();

Friday, November 11, 2011

Android Cloud to Device Messaging(C2DM) Tutorial

                               Android Cloud to Device Messaging(C2DM) Tutorial  

This tutorial is for getting started with Android Cloud to Device Messaging (C2DM) on Android. In the iOS world it is knows as “push notifications”.

This feature will definitely help developers and their apps to streamline and optimize the data transfers. This would mean that apps now do not have to poll their servers at regular intervals to check for updates. The servers will be able to send updates (like Push Notifications) to the devices and makes it easier for mobile applications to sync data with servers.


There are many different ways of accomplishing the same thing(polling,constant server connections,SMS messages).

C2DM Alternatives:

Polling: The application itself would periodically poll your servers to check for new messages. You would need to implement everything from queuing messages to writing the polling code. Alerts are no good if they’re delayed due to a low polling period but the more frequently you poll, the more the battery is going to die.

SMS: Android can intercept SMS messages and you could include a payload to tell the application what to do. But then why not just use SMS in the first place? SMS is costly.

Persistent Connection: This would solve the problem of periodic polling but would destroy the battery life.
                                                   Cloud to device messaging   

“Android Cloud to Device Messaging (C2DM) is a service that helps developers send data from servers to their applications on Android devices. The service provides a simple, lightweight mechanism that servers can use to tell mobile applications to contact the server directly, to fetch updated application or user data. The C2DM service handles all aspects of queueing of messages and delivery to the target application running on the target device.”

It is a server push service provided by Google so that 3rd party applications can push messages to their applications on android devices.
Here are a few basic things to know about C2DM:

    It requires Android 2.2; C2DM uses Google services which are present on any device running the Android Market.
    It uses existing connections for Google services. This requires the users to sign into their Google account on Android.
    It allows 3rd party servers to send lightweight data messages to their apps. The C2DM service is not designed for pushing a lot of user content; rather it should be used like a “tickle”, to tell the app that there is new data on the server, so the app can fetch it.
    An application doesn’t need to be running to receive data messages. The system will wake up the app via an Intent broadcast when the the data message arrives, so long as the app is set up with the proper Intent Receiver and permissions.
    No user interface is required for receiving the data messages. The app can post a notification (or display other UI) if it desires.


Tuesday, October 18, 2011

How to run a Runnable thread in Android?

How to run a Runnable thread in Android?...

 final ProgressDialog progressDialog = 
ProgressDialog.show(InboxActivity.this, "","Loading...", true, true); 
Handler handler=new Handler();
Runnable r=new Runnable()
{
    public void run() 
    {
       your method here();
          progressDialog.dismiss(); 
       
    }
};
handler.postDelayed(r, 1000);


Wednesday, October 12, 2011

Gesture List Example

Gesture List Example;


Activity Code:


import java.text.MessageFormat;
import java.util.ArrayList;

import android.app.Activity;
import android.app.AlertDialog;
import android.app.ListActivity;
import android.content.DialogInterface;

import android.os.Bundle;

import android.util.DisplayMetrics;
import android.view.GestureDetector;
import android.view.GestureDetector.SimpleOnGestureListener;
import android.view.MotionEvent;
import android.view.View;
import android.widget.AdapterView;
import android.widget.ArrayAdapter;

import android.widget.ListView;

import android.widget.Toast;

public class GesturesListActivity extends Activity  {
    private int REL_SWIPE_MIN_DISTANCE;
    private int REL_SWIPE_MAX_OFF_PATH;
    private int REL_SWIPE_THRESHOLD_VELOCITY;
    ListView lv;
    @Override
    public void onCreate(Bundle savedInstanceState) {
        super.onCreate(savedInstanceState);

        // As paiego pointed out, it's better to use density-aware measurements.
        DisplayMetrics dm = getResources().getDisplayMetrics();
        REL_SWIPE_MIN_DISTANCE = (int)(120.0f * dm.densityDpi / 160.0f + 0.5);
        REL_SWIPE_MAX_OFF_PATH = (int)(250.0f * dm.densityDpi / 160.0f + 0.5);
        REL_SWIPE_THRESHOLD_VELOCITY = (int)(200.0f * dm.densityDpi / 160.0f + 0.5);
             setContentView(R.layout.main);
       // ListView lv = getListView();
              lv=(ListView)findViewById(R.id.list);
        lv.setAdapter(new ArrayAdapter<String>(this, android.R.layout.simple_list_item_1,
            m_Starbucks));

        final GestureDetector gestureDetector = new GestureDetector(new MyGestureDetector());
        View.OnTouchListener gestureListener = new View.OnTouchListener() {
            public boolean onTouch(View v, MotionEvent event) {
                return gestureDetector.onTouchEvent(event);
            }};
        lv.setOnTouchListener(gestureListener);

        // Long-click still works in the usual way.
        lv.setOnItemLongClickListener(new AdapterView.OnItemLongClickListener() {
            public boolean onItemLongClick(AdapterView<?> parent, View view, int position, long id) {
                String str = MessageFormat.format("Item long clicked = {0,number}", position);
                Toast.makeText(GesturesListActivity.this, str, Toast.LENGTH_SHORT).show();
                return true;
            }
        });
    }

    // Do not use LitView.setOnItemClickListener(). Instead, I override
    // SimpleOnGestureListener.onSingleTapUp() method, and it will call to this method when
    // it detects a tap-up event.
    private void myOnItemClick(int position) {
        String str = MessageFormat.format("Item clicked = {0,number}", position);
        Toast.makeText(this, str, Toast.LENGTH_SHORT).show();
    }

    private void onLTRFling() {
        Toast.makeText(this, "Left-to-right fling", Toast.LENGTH_SHORT).show();
        AlertDialog.Builder builder = new AlertDialog.Builder(this);
        builder.setMessage("Are you sure delete this contact?")
               .setCancelable(false)
               .setPositiveButton("Yes", new DialogInterface.OnClickListener() {
                   public void onClick(DialogInterface dialog, int id) {
                        GesturesListActivity.this.finish();
                   }
               })
               .setNegativeButton("No", new DialogInterface.OnClickListener() {
                   public void onClick(DialogInterface dialog, int id) {
                        dialog.cancel();
                   }
               });
        AlertDialog alert = builder.create();
        alert.show();
    }

    private void onRTLFling() {
        Toast.makeText(this, "Right-to-left fling", Toast.LENGTH_SHORT).show();
        AlertDialog.Builder builder = new AlertDialog.Builder(this);
        builder.setMessage("Are you sure delete this contact?")
               .setCancelable(false)
               .setPositiveButton("Yes", new DialogInterface.OnClickListener() {
                   public void onClick(DialogInterface dialog, int id) {
                        GesturesListActivity.this.finish();
                   }
               })
               .setNegativeButton("No", new DialogInterface.OnClickListener() {
                   public void onClick(DialogInterface dialog, int id) {
                        dialog.cancel();
                   }
               });
        AlertDialog alert = builder.create();
        alert.show();
    }

    class MyGestureDetector extends SimpleOnGestureListener{

        // Detect a single-click and call my own handler.
        @Override
        public boolean onSingleTapUp(MotionEvent e) {
          //  ListView lv = getListView();
            int pos = lv.pointToPosition((int)e.getX(), (int)e.getY());
            myOnItemClick(pos);
            return false;
        }

        @Override
        public boolean onFling(MotionEvent e1, MotionEvent e2, float velocityX, float velocityY) {
            if (Math.abs(e1.getY() - e2.getY()) > REL_SWIPE_MAX_OFF_PATH)
                return false;
            if(e1.getX() - e2.getX() > REL_SWIPE_MIN_DISTANCE &&
                Math.abs(velocityX) > REL_SWIPE_THRESHOLD_VELOCITY) {
                onRTLFling();
            }  else if (e2.getX() - e1.getX() > REL_SWIPE_MIN_DISTANCE &&
                Math.abs(velocityX) > REL_SWIPE_THRESHOLD_VELOCITY) {
                onLTRFling();
            }
            return false;
        }

    }

    private static final String[] m_Starbucks = {
        "Latte", "Cappuccino", "Caramel Macchiato", "Americano", "Mocha", "White Mocha",
        "Mocha Valencia", "Cinnamon Spice Mocha", "Toffee Nut Latte", "Espresso",
        "Espresso Macchiato", "Espresso Con Panna"
    };
}

main.xml


<?xml version="1.0" encoding="utf-8"?>
    <ListView
    xmlns:android="http://schemas.android.com/apk/res/android"
        android:id="@+id/list" 
        android:layout_width="fill_parent"
        android:layout_height="fill_parent"  />


Thursday, September 29, 2011

Kill all activities when HOME key is pressed android

Kill all activities when HOME key is pressed android
Set android:clearTaskOnlaunch="true" on the activity launched from the home screen.
You might also check some of the other attributes you can specify on activity, to tweak it's behavior a bit more.
On main activity add:
    android:launchMode="singleTask" android:clearTaskOnLaunch="true"
android:finishOnTaskLaunch="true"

How to remove focus and hide the on screen Keyboard?

How to remove focus and hide the on screen Keyboard.
EditTest on focus changed key board will hide. 
InputMethodManager imm = (InputMethodManager)getSystemService(Context.INPUT_METHOD_SERVICE);
imm.hideSoftInputFromWindow(editTextField.getWindowToken(), 0);
or onclick button key board hide... 
 btnSend.setOnClickListener(new OnClickListener() 
        {
            public void onClick(View v) 
            {
            
             //***Key Board Hide****//
             InputMethodManager imm = (InputMethodManager)getSystemService(Context.INPUT_METHOD_SERVICE);
             imm.hideSoftInputFromWindow(mOutEditText.getWindowToken(), 0);
               
              }});

Friday, September 23, 2011

Get Current Activity and Package Name in android

Get Current Activity  and Package Name in android.

    ActivityManager am = (ActivityManager) this .getSystemService(ACTIVITY_SERVICE);
   List<RunningTaskInfo> taskInfo = am.getRunningTasks(1);
    ComponentName componentInfo = taskInfo.get(0).topActivity;
    Log.d(WebServiceHelper.TAG, "CURRENT Activity ::" + taskInfo.get(0).topActivity.getClassName()+"   Package Name :  "+componentInfo.getPackageName());
   

Monday, September 19, 2011

Android: Refresh Activity from Notification

Android: Refresh Activity from Notification;

When creating the pending intent, one should pass PendingIntent.FLAG_UPDATE_CURRENT as such: PendingIntent contentIntent = PendingIntent.getActivity( context, 0, notificationIntent, PendingIntent.FLAG_UPDATE_CURRENT );

Wednesday, September 14, 2011

ERROR: the user data image is used by another emulator. aborting

ERROR: the user data image is used by another emulator. aborting


Go to .android folder from Users folder. Once you are in .android go to avd folder. Select the emulator, which you are using. Inside that folder you will see two folders:
cache.img.lock and userdata-qemu.img.lock. Delete both these folders and then just restart the emulator.

Thursday, September 1, 2011

Two layouts to be loaded for single activity

Two layouts to be loaded for single activity with custom dialog

How to display a custom dialog in your Android application
Yesterday Jozsi showed you, how to make an alert dialog, today I'm going to show you, how to make a custom dialog/popup window.
Sometimes, it's better to make your own dialog, because this way, you can display whatewer you want., the way you want it.
First, make your own layout, with the needed elements. Here, I'm going to use two buttons, a textview inside a scrollview, and an imageview...

 main.class

  public class main extends Activity {
        @Override
        public void onCreate(Bundle savedInstanceState) {
            super.onCreate(savedInstanceState);
            //set up main content view
            setContentView(R.layout.main);
            //this button will show the dialog
            Button button1main = (Button) findViewById(R.id.Button01main);
     
            button1main.setOnClickListener(new OnClickListener() {
            @Override
                public void onClick(View v) {
                    //set up dialog
                    Dialog dialog = new Dialog(main.this);
                    dialog.setContentView(R.layout.maindialog);
                    dialog.setTitle("This is my custom dialog box");
                    dialog.setCancelable(true);
                    //there are a lot of settings, for dialog, check them all out!
     
                    //set up text
                    TextView text = (TextView) dialog.findViewById(R.id.TextView01);
                    text.setText(R.string.lots_of_text);
     
                    //set up image view
                    ImageView img = (ImageView) dialog.findViewById(R.id.ImageView01);
                    img.setImageResource(R.drawable.nista_logo);
     
                    //set up button
                    Button button = (Button) dialog.findViewById(R.id.Button01);
                    button.setOnClickListener(new OnClickListener() {
                    @Override
                        public void onClick(View v) {
                            finish();
                        }
                    });
                    //now that the dialog is set up, it's time to show it    
                    dialog.show();
                }
            });
        }
     }

Tuesday, August 23, 2011

Android Horizontal ScrollView Menu Bar

Android Horizontal Scroll View with custom Layout.

Download Scource Code
we can create custom horizontal menu bar... using horizontal scroll view

layout.xml
 <?xml version="1.0" encoding="utf-8"?>
<LinearLayout xmlns:android="http://schemas.android.com/apk/res/android"
    android:orientation="vertical"
    android:layout_width="fill_parent"
    android:layout_height="fill_parent"
    >
 
    <HorizontalScrollView android:layout_width="fill_parent" android:layout_height="wrap_content">
        <LinearLayout
        android:id="@+id/horizontalMenu"  android:orientation="horizontal"
        android:layout_width="fill_parent" android:layout_height="fill_parent"
        >
            <Button android:text="Button" android:id="@+id/button1"
            android:layout_width="wrap_content" android:layout_height="wrap_content"></Button>
         <TextView android:text="1" android:id="@+id/textView1"
    android:layout_width="100dip"
    android:layout_height="wrap_content"></TextView>
  
     <TextView android:text="2" android:id="@+id/textView1"
    android:layout_width="100dip"
    android:layout_height="wrap_content"></TextView>
     <TextView android:text="3" android:id="@+id/textView1"
    android:layout_width="100dip"
    android:layout_height="wrap_content"></TextView>
     <TextView android:text="4" android:id="@+id/textView1"
    android:layout_width="100dip"
    android:layout_height="wrap_content"></TextView>
        </LinearLayout>
    </HorizontalScrollView>
  
  
</LinearLayout>


Thursday, August 18, 2011

android.content.res.Resources$NotFoundException:

Resources NotFoundException

 The below Resources$NotFoundException log results from user error and is easily fixed.

 ERROR/AndroidRuntime(9202): Caused by: android.content.res.Resources$NotFoundException: String resource ID #0x1
08-18 12:32:14.057:
ERROR/AndroidRuntime(9202):   at android.content.res.Resources.getText(Resources.java:201)
08-18 12:32:14.057:
 ERROR/AndroidRuntime(9202):  at android.widget.TextView.setText(TextView.java:2853)


I get this error when I am trying to set a View’s text using an integer value like:

 text.setText(SomeInteger) // This is incorrect !

Instead, to set the text of a view using an integer, you need to do:
text.setText(Integer.toString(SomeInteger)) // setText with an int
The problem is that setText(int) is reserved for string resource ids, like:
view.setText(R.string.someStringId) // setText with a string resource id


Tuesday, August 16, 2011

Get camera capture image path in android

Get camera capture image path in android

calling camera 
Intent cameraIntent = new Intent(android.provider.MediaStore.ACTION_IMAGE_CAPTURE);
                    startActivityForResult(Intent.createChooser(cameraIntent,"Select Picture"), CAMERA_PIC_REQUEST1);


on result activity


 final ContentResolver cr = getContentResolver();    
                   final String[] p1 = new String[] {
                           MediaStore.Images.ImageColumns._ID,
                           MediaStore.Images.ImageColumns.DATE_TAKEN
                   };                   Cursor c1 = cr.query(MediaStore.Images.Media.EXTERNAL_CONTENT_URI, p1, null, null, p1[1] + " DESC");     
                   if ( c1.moveToFirst() ) {
                      String uristringpic = "content://media/external/images/media/" +c1.getInt(0);
                      Uri newuri = Uri.parse(uristringpic);
                      Log.i("TAG", "newuri   "+newuri);
                   
                }
                   c1.close();
               
                }
then u can
get Uri path capture image

Thursday, August 11, 2011

Android copy image from gallery folder onto SD Card

Android copy image from gallery folder onto SD Card

You can launch the gallery picker intent with the following:
 intent directly calling gallry folder only
Intent(Intent.ACTION_PICK, MediaStore.Images.Media.INTERNAL_CONTENT_URI)


//method
 public void imageFromGallery() {
    Intent getImageFromGalleryIntent = 
      new Intent(Intent.ACTION_PICK, MediaStore.Images.Media.INTERNAL_CONTENT_URI);
    startActivityForResult(getImageFromGalleryIntent, SELECT_IMAGE);
}


---------*************----------------
public void onActivityResult(int requestCode, int resultCode, Intent data) {
    super.onActivityResult(requestCode, resultCode, data);
    if (resultCode == RESULT_OK) {
        switch(requestCode) {
        case SELECT_IMAGE:
            mSelectedImagePath = getPath(data.getData());
            break;
    }
}
public String getPath(Uri uri) {
    String[] projection = { MediaStore.Images.Media.DATA };
    Cursor cursor = managedQuery(uri, projection, null, null, null);
    startManagingCursor(cursor);
    int column_index = cursor.getColumnIndexOrThrow(MediaStore.Images.Media.DATA);
    cursor.moveToFirst();
    return cursor.getString(column_index);
}

Android ListView Disable Divider Line and Background Color

Android ListView Disable Divider Line  and Background Color

in android listview if u don't want divider line u have to add this line in listview tag
android:divider="#00000000"
 android:dividerHeight="0dip"

if u don't want background color u have add this line
 android:cacheColorHint="#00000000"

<ListView android:layout_height="fill_parent"
 android:id="@+id/albumListView"
 android:cacheColorHint="#00000000"
 android:divider="#00000000"
 android:dividerHeight="0dip"
  android:layout_width="fill_parent">
  </ListView>

Thursday, June 30, 2011

Android kSoap2 web service parsing Data

Android kSoap2 web service Parsing Data
In this tutorial for Android ksoap2 web service . we can passing data through web service and store the data in web server.
how to read and parse JSON or XML, but another (pretty big) format is SOAP. In this post we will see how you make a application that reads and parses SOAP data into a Android application!
first we need ksoap2-android-assembly-2.4-jar file. download this jar file and put your workspace lib folder.

Download latest ksoap Jar File
Note: At the time of writing this the most recent version is 2.5.4 .
  • Just click the most recent version
  • search for the jar file with dependencies.
  • download it by right clicking the link "Raw file"
  • then clicking "Save as ...".
  • Save it inside your project folder so you can link it easily.
Note: add the jar file to the project. ( Project properties -> Java build path -> Add JAR's )
Download ksoap2 JAR File
Source code
package com.soap;
import java.io.*;
import org.ksoap2.SoapEnvelope;
import org.ksoap2.serialization.SoapObject;
import org.ksoap2.serialization.SoapPrimitive;
import org.ksoap2.serialization.SoapSerializationEnvelope;
import org.ksoap2.transport.AndroidHttpTransport;
import org.ksoap2.transport.HttpTransportSE;
import org.xmlpull.v1.XmlPullParser;
import org.xmlpull.v1.XmlPullParserException;
import org.xmlpull.v1.XmlPullParserFactory;
import android.app.Activity;
import android.content.Intent;
import android.os.Bundle;
import android.util.Log;
import android.view.View;
import android.view.View.OnClickListener;
import android.widget.EditText;
import android.widget.ImageButton;
import android.widget.Toast;
public class Mainactivity extends Activity {
    ImageButton b;
     
    private final String NAMESPACE = "http://str7......com/";
    private final String METHOD_NAME = "InsertChild";
    private final String SOAP_ACTION = "http://str7..........com/InsertChild";
    private final String URL = "http://str7...........com/custodyapp.asmx";
   // protected static final String END_DOCUMENT =null;
    @Override
    public void onCreate(Bundle savedInstanceState) {
        super.onCreate(savedInstanceState);
        setContentView(R.layout.main);
                 //   SoapObject request = new SoapObject(NAMESPACE, METHOD_NAME);
                 ///  request.addProperty("ChildName","ijay");
                   SoapObject request = new SoapObject(NAMESPACE, METHOD_NAME);
                    request.addProperty("ChildName","Vijay");
                    request.addProperty("GroupID","15");
                   request.addProperty("ParentID","15");
                   request.addProperty("Remarks","good");
                    SoapSerializationEnvelope envelope = new SoapSerializationEnvelope(
                      SoapEnvelope.VER11);
                    envelope.dotNet=true;
                    envelope.setOutputSoapObject(request);                                 .
                    HttpTransportSE  httpTransport = new HttpTransportSE(URL);
                    httpTransport.debug = true;
                    try {
                     httpTransport.call(SOAP_ACTION, envelope);
                     SoapObject result = (SoapObject) envelope.bodyIn;
                           Log.i("Result........................", result.toString());
                                                      
                    } catch (IOException e) {
                     // TODO Auto-generated catch block
                     e.printStackTrace();
                    } catch (XmlPullParserException e) {
                     // TODO Auto-generated catch block
                     e.printStackTrace();
                    } // This sends a soap
                   Log.i(envelope.bodyIn.toString(),"....................");
    }}

Check out this may be help you

Related Posts Plugin for WordPress, Blogger...